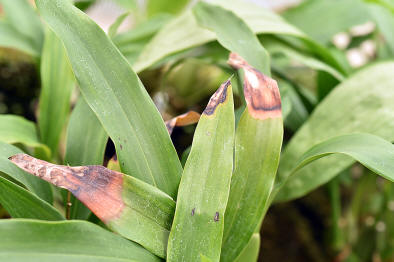
From the left hand image you can see brown tips on the leaves. This is generally an indicator that the plant has had its roots too wet for too long. It could be getting too much water or the potting mixture could have broken down and become too fine i.e. it has lost its drainage ability and is sour and soggy. They can cope with masses of water provided they are allowed to dry out between waterings so that the roots can get plenty of air. Without plenty of air the plant simply drowns like an animal but in slow motion. Look carefully at the leaves in the image and you can see salt deposits building up. This can be a problem with constant overhead watering - especially misting.
As
the plant drowns the roots die. Without roots the plants cannot feed.
The plant will start living on its stored food. The fat psuedobulbs will
start to shrivel as it goes on a severe diet. To minimize food
consumption the plant will cut back supplies to the extremities (i.e.
the leaf tips) and they will start dying or going
yellow/brown.
Some leaves will turn
completely
yellow and drop off.
During winter or cold weather some growers stop watering altogether. Don't copy these growers but do reduce your watering because water takes longer to drain and/or evaporate in winter. The soil can become waterlogged and sour more quickly unless you go to the ridiculous step of repotting the plant into a 'winter' mix which would have super drainage and fresh air. In nature some plants live their whole life cycle in a damp cold climate! Also, there are few places in nature where there is no moisture during winter.
Pumping fertilizer
into the pot at this stage
doesn’t work
because the plant doesn’t have any roots to take it in
(fertiliser only works when the plant is actively growing).
The pH of the soil will have become very acidic and sour from the
dampness and the anaerobic environment. If the climate is cold the
symptoms will be worse.
It all sounds shocking – but not so. Most plants are like humans and they want to live. They will struggle for a long time before they die. It does need to be repotted very soon.
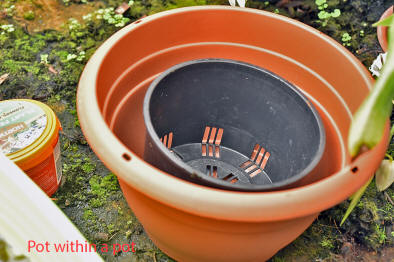
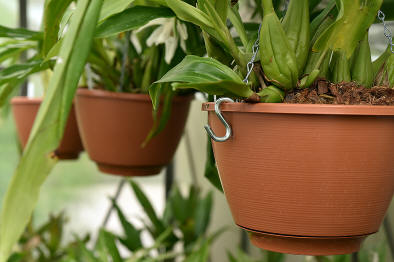
The left hand image above shows a hanging pot with an attached tray that holds a tiny bit of water. I highly recommend these pots. Inside this pot the plant has its own pot. These pots keep a higher level of humidity around the roots without letting them get water-logged. Using a pot within a pot creates a barrier chamber for this moist air and also insulation from external heat, especially the sun. Note the good drainage holes in the black pot.
After repotting a plant place it in a bucket of water and soak it for several hours. Remove it and let it drain. It will feel quite heavy because of all the water retained. Feel the pot again in a week (or at regular intervals) and when it feels very light it can be put in the bucket again (for half an hour or so but if you forget then a whole day won't do any harm). This is the best way to water most pot plants but is a bit tedious and time consuming. Most people can't afford this much time and compromise by using a hose sprinkler or even an automatic overhead spray system.
A problem with using a hose or a sprinkler system is that often the water will run right through the pot. The amount of water running through looks very convincing in making the pot look like it has been thoroughly watered. In many cases the water has run through some well camouflaged channels very quickly and the surrounding media has not been able to absorb and retain any of the moisture during the few seconds of flooding. Some growers worry about water pooling in the plant leaf junctions. This happens in nature every time it rains and should not be a concern. However, overhead sprinklers can leave water marks on some flowers and spoil their pristine appearance.
A popular supplement to watering is using a misting machine. They increase the humidity for the plants and especially for any aerial roots. Apart from misting systems costing significantly they can bring other management problems. The machine should be producing micron size droplets. These are so fine that they produce a fog that feels dry. They are designed to raise the humidity - not water the plant. If the droplets are large enough to feel with your hand then the plants and everything else will have a wet layer over them. This will produce a mass of mould, salt deposits and disease throughout the glasshouse along with snails, slugs and other critters. This will need to be compensated with fans to produce strong ventilation. A catch 22 develops as you let more of the air out of the glasshouse to reduce these problems you loose more of the precious humidity.
Two easy and effective ways of increasing humidity and moisture levels in a greenhouse/glasshouse are as follows:
1. Place a deep layer of coarse mulch on the floor. Garden mulch or wood chips are good because they take a long time to rot and break down. The mulch holds water and creates a nice humid atmosphere. It is also a good way of re-cycling water and preventing wasted run-off. If it is a dirt floor cover the floor with a layer of builders plastic sheeting before topping this with a deep layer of wood chips, or for more permanency, use gravel.
2. Cover the benches with metal or polycarbonate type roofing material. Again cover this with a layer of moisture retaining foam (I recycled old carpet underlay foam). Sit your pots on top of this layer. It will create a very humid atmosphere at very low cost. Eventually it will also support a healthy layer of mosses into which many orchids will send their roots. .
In the above conditions Coelogynes will survive in temperatures up to 40 degrees celsius or more. The downside is that these high levels of humidity also need high ventilation and control of snails, slugs, mould, etc.
If you only have a few orchids you can sit the pots on a shallow tray of gravel and add water. The bottom of the pot should not be allowed to sit in the water but should be very close.The image on the right above shows my effort for watering plants mounted on wood or plants with a lot of aerial roots. In temperate climatic zones it becomes even more critical to keep humidity high. The plants are attached to steel mesh but behind this is an old woolen blanket wicking water from a water-filled trough (roof guttering) in which the water is controlled by a float switch. This system is supplemented by spray misters and the air/humidity is circulated by air fans.
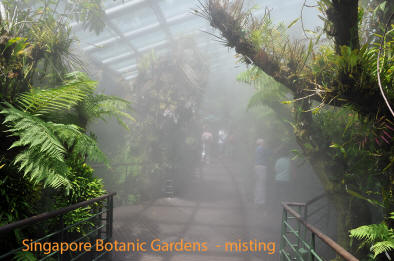
The image on the right, taken in Singapore Botanical Gardens shows high level fogging. Note how the fog reduces the lighting and think of high cloudy mountains. This creates a perfect environment for orchids. In this environment the plants need absolutely minimal media (soil) and have absolutely minimal chance of having their roots waterlogged. The plants have all the moisture they want but just as importantly, their roots have all the air they want. Whenever you are watering your plants keep asking yourself if they are getting this balance of humidity and air. The further you get from the tropics the more you have to use your judgement to try and achieve this balance. The closer you achieve it the better your plants will grow. This doesn't have to be high cost. Part of the fun in the hobby is swapping ideas and using your imagination.
A final watering hint is to keep similar plants together. Keep small pots together. Keep similar potting mixtures together. Keep mounted plants together. In a very small collection this may not be possible but should be aimed for in larger collections. Small pots will need less water more often than big plants. Plants mounted on wood, branches, etc. tend to dry out very quickly and need more frequent watering. Water from larger leaves on bigger plants can channel a lot of water into nearby small pots causing flooding (and can also block the light from the small plants). Larger leaves can also block water getting to smaller plants leaving them in a rain shadow and causing them to suffer drought conditions.
If you like to really bond with your plants you can completely water by hand even if this means hand misting several times a day in hot dry climates such as Australia.
| < Repotting | Back to General Cultivation > |
